n8n + Cloudflare Tunnel: Self-Host Without Open Ports (2026)
When I decided to host n8n at home, I knew I didn’t want to expose it directly to the internet.
I wanted a clean, secure setup — something scalable, easy to maintain, and protected without needing to open up ports on my home firewall.
After testing a few approaches, I ended up building a simple and secure setup using:
- Docker Compose (with Traefik reverse proxy)
- PostgreSQL for persistent storage
- Cloudflare Tunnel (Zero Trust) to securely expose my services
- Cloudflare Access to protect the n8n UI login page
This guide walks you through how I run n8n on my home server today — including the exact docker-compose.yml and .env files I use.
Overview of the Setup
- Dockerized n8n with Traefik
- Cloudflare Tunnel — no open ports needed
- PostgreSQL backend for stability
- Two hostnames: one for the UI, one for webhook endpoints
- UI login protected with Cloudflare Access
Prerequisites
- A Cloudflare account with your domain added
- A Linux server (I’m running Ubuntu 24.04)
- Docker and Docker Compose installed
- Basic SSH access to your server
1. Create the Project Directory
On your home server, create a clean directory to store your n8n setup:
mkdir -p ~/n8n-stack
cd ~/n8n-stack
2. Create Your .env File
Create a .env file with your environment variables:
I’m using
vimin this article, but feel free to use any editor you’re comfortable with.
vim .envPaste in your settings (replace with your actual passwords and tokens):
# Database
POSTGRES_USER=root
POSTGRES_PASSWORD=yourpassword
POSTGRES_DB=n8n

# n8n secrets
N8N_ENCRYPTION_KEY=your-super-secret-key
N8N_USER_MANAGEMENT_JWT_SECRET=your-even-more-secret

# Authentication
N8N_BASIC_AUTH_ACTIVE=true
N8N_BASIC_AUTH_USER=admin
N8N_BASIC_AUTH_PASSWORD=yourpassword

# Hostnames
N8N_HOST=n8n.yourdomain.com
N8N_WEBHOOK=webhook.yourdomain.com
N8N_PROTOCOL=https
N8N_PORT=5678

# Timezone
GENERIC_TIMEZONE=Europe/Oslo

# Cloudflare Tunnel
CLOUDFLARE_TUNNEL_TOKEN=your_cloudflare_tunnel_token
Save and exit. (If you’re in insert mode, press Esc, then type :wq and hit Enter to save and exit.)
3. Create Your docker-compose.yml
Still inside the same folder, create your Docker Compose file:
vim docker-compose.ymlPaste this configuration (this is my current production setup):
volumes:
  n8n_storage:
  postgres_storage:
  traefik_data:

networks:
  n8n-net:

x-n8n: &service-n8n
  image: n8nio/n8n:latest
  networks: ['n8n-net']
  environment:
    - DB_TYPE=postgresdb
    - DB_POSTGRESDB_HOST=postgres
    - DB_POSTGRESDB_USER=${POSTGRES_USER}
    - DB_POSTGRESDB_PASSWORD=${POSTGRES_PASSWORD}
    - N8N_DIAGNOSTICS_ENABLED=false
    - N8N_PERSONALIZATION_ENABLED=false
    - N8N_ENCRYPTION_KEY=${N8N_ENCRYPTION_KEY}
    - N8N_USER_MANAGEMENT_JWT_SECRET=${N8N_USER_MANAGEMENT_JWT_SECRET}
    - WEBHOOK_URL=https://${N8N_WEBHOOK}
    - N8N_HOST=${N8N_HOST}
    - N8N_PORT=5678
    - N8N_PROTOCOL=https
    - N8N_BASIC_AUTH_ACTIVE=${N8N_BASIC_AUTH_ACTIVE}
    - N8N_BASIC_AUTH_USER=${N8N_BASIC_AUTH_USER}
    - N8N_BASIC_AUTH_PASSWORD=${N8N_BASIC_AUTH_PASSWORD}

services:
  traefik:
    image: traefik:v2.10
    container_name: traefik
    restart: always
    networks: ['n8n-net']
    command:
      - "--api=true"
      - "--providers.docker=true"
      - "--providers.docker.exposedbydefault=false"
      - "--entrypoints.n8n_ui.address=:8082"
      - "--entrypoints.n8n_webhooks.address=:8083"
    ports:
      - "8082:8082"
      - "8083:8083"
    volumes:
      - traefik_data:/letsencrypt
      - /var/run/docker.sock:/var/run/docker.sock:ro

  postgres:
    image: postgres:16-alpine
    hostname: postgres
    networks: ['n8n-net']
    restart: unless-stopped
    environment:
      - POSTGRES_USER=${POSTGRES_USER}
      - POSTGRES_PASSWORD=${POSTGRES_PASSWORD}
      - POSTGRES_DB=${POSTGRES_DB}
    volumes:
      - postgres_storage:/var/lib/postgresql/data
    healthcheck:
      test: ['CMD-SHELL', 'pg_isready -h localhost -U ${POSTGRES_USER} -d ${POSTGRES_DB}']
      interval: 5s
      timeout: 5s
      retries: 10

  n8n:
    <<: *service-n8n
    hostname: n8n
    container_name: n8n
    restart: unless-stopped
    volumes:
      - n8n_storage:/home/node/.n8n
      - ./n8n/backup:/backup
      - ./shared:/data/shared
    depends_on:
      postgres:
        condition: service_healthy
    labels:
      - "traefik.enable=true"
      - "traefik.http.routers.n8n-ui.rule=Host(`${N8N_HOST}`)"
      - "traefik.http.routers.n8n-ui.entrypoints=n8n_ui"
      - "traefik.http.routers.n8n-webhooks.rule=Host(`${N8N_WEBHOOK}`)"
      - "traefik.http.routers.n8n-webhooks.entrypoints=n8n_webhooks"
      - "traefik.http.services.n8n.loadbalancer.server.port=5678"

  cloudflared:
    image: cloudflare/cloudflared:latest
    container_name: cloudflared
    restart: always
    networks: ['n8n-net']
    command: tunnel --no-autoupdate run --token ${CLOUDFLARE_TUNNEL_TOKEN}
    environment:
      - TUNNEL_TOKEN=${CLOUDFLARE_TUNNEL_TOKEN}
Save and exit.
4. Set Up the Cloudflare Tunnel (Zero Trust)
With the docker-compose.yml and .env files ready, the next step is securing public access using Cloudflare Tunnel.
This way, I don’t need to expose any ports on my home network — everything routes through Cloudflare.
Here’s how I set it up:
4.1 Create a Tunnel in Cloudflare Zero Trust
- Go to your Cloudflare Zero Trust dashboard.
- Navigate to Zero Trust → Networks → Tunnels.
- Click Create a Tunnel.
- Select Cloudflared, and give your tunnel a name (I named mine
n8n).

On the Choose your environment page, select Dcoker. Cloudflare will generate a Docker command to run the cloudflared container.
You don’t need the full command because you’re managing it in Docker Compose already — just grab the token part.
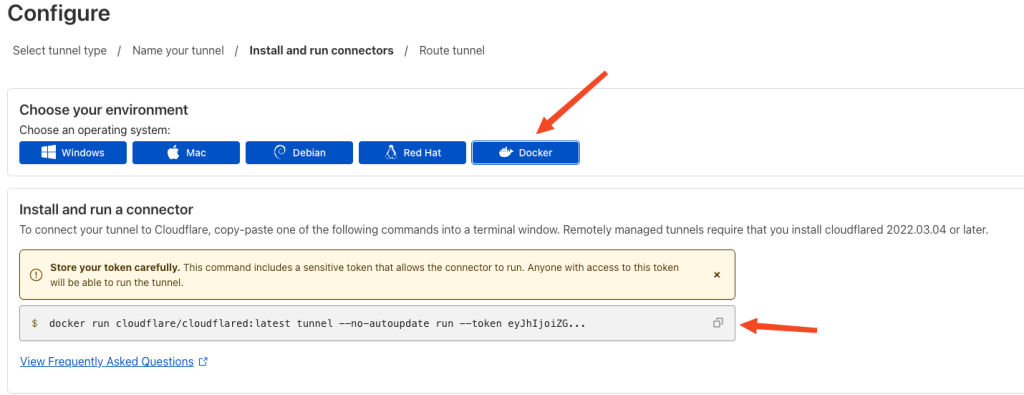
Example:
docker run cloudflare/cloudflared:latest tunnel --no-autoupdate run --token eyJhIjoiZGU.....Copy the token (the long eyJhI... string), and Click Next.
4.2 Update Your .env with the Tunnel Token
Open your .env file and paste the token:
vim .envUpdate the line:
CLOUDFLARE_TUNNEL_TOKEN=your_full_token_hereSave and exit.
Now your cloudflared service in Docker will authenticate securely with Cloudflare Zero Trust.
4.3 Create Public Hostnames
In the Route Traffic page:
Add two hostnames: n8n, and webhook, and Click Save Tunnel.


Important:
Make sure the container ports doesn’t overlap with other services running on the docker host.
5. Protect the n8n UI with Cloudflare Access
Since I’m exposing the UI publicly (n8n.yourdomain.com), I also locked it down with Cloudflare Access.
Here’s how:
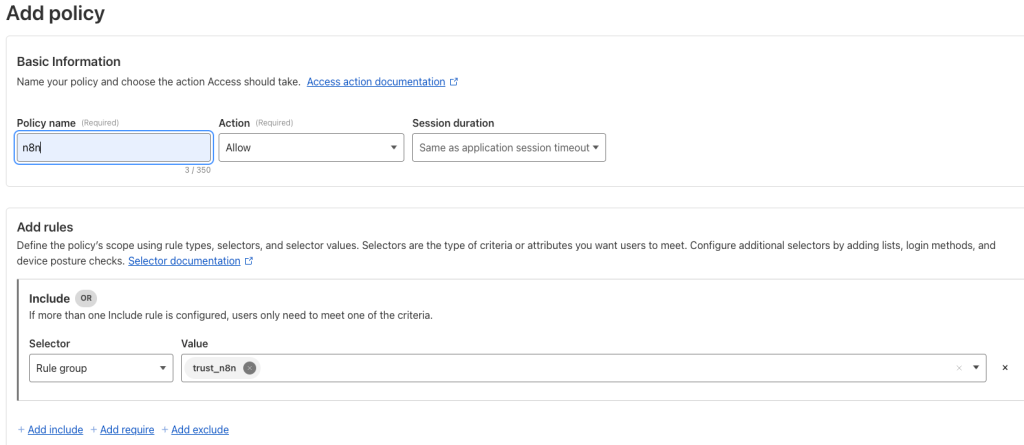
Go to Rule Groups
- Click Add a group
- Rule group name:
n8n - Selector: Emails (type an email you trust) and click Save.

Go to Access → Applications.
- Click Add an application → Self-hosted.
- Application Name:
n8n - Application Domain:
n8n.yourdomain.com

- Under Policies, create a new policy and select the Rule Group you created earlier, and Click Save.
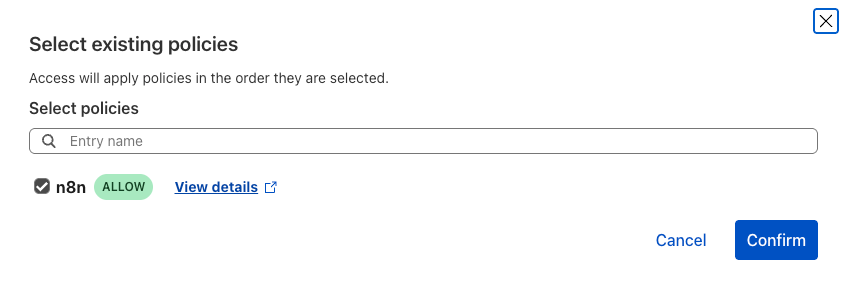
Head back to Applications, under access policies select the policy you created earlier, and Click Confirm.
For login methods, I personally use default One-Time PIN authentication, which is fast and doesn’t require managing OAuth settings.

This protects the n8n dashboard while keeping webhook endpoints open and functional.
6. Start Everything
Now that everything is configured, simply start your services:
While in ~/n8n-stack run the following:
docker compose up -dDocker will:
- Start PostgreSQL
- Start n8n
- Start Traefik
- Start the Cloudflare Tunnel
Your n8n dashboard should now be reachable at: https://n8n.yourdomain.com
And your webhook URLs will work through: https://webhook.yourdomain.com/webhook/xxxxx
Final Thoughts
This setup has been rock solid for me — no need to touch the firewall, no worries about exposing services, and easy to backup and restore using Docker volumes.
If you’re self-hosting at home and want real cloud-level security, using Cloudflare Tunnel and Access with Docker is a great way to do it.
(This will also work for VPS providers such as Digital Ocean, Hetzner, etc).
Found this helpful?
I share more automation projects, self-hosting setups, and real-world workflows here on the blog — and I share code examples on GitHub.
If you want to learn more or talk about building your own homelab automations, join my skool community Build & Automate.


Hi Kjetil,
Thank a lot for this tutorial. Currently unable to access to n8n but I’m not sure what the content of the Traefik:8082 and Traefik:8083 in the conf of Cloudflare ? it is localhost or other ?
Pierre
Hello Pierre, thank you for your comment!
In Cloudflare, where you configure the public hostname, you set up traefik:8082 for the n8n UI and traefik:8083 for the n8n webhook. The Traefik container handles the internal routing, and the Cloudflare Tunnel exposes it publicly.
If you’d like, feel free to share your docker-compose.yml and I can take a look.